|
This was the 6th Annual "Sex, Drugs, and Rock n'
Roll" exhibition held by the Paper Heart
Gallery and my challenge was once again to come up with a bodypainting that characterized this historic expression. My first inclination was to do a Led Zepplin theme, but when I was referred to model Sonja Allen by XPOZ magazine, there was no doubt what my theme would be. It had to be Hendrix.
Illusion Magazine, a body art magazine based in England, had asked me to contribute a step-by-step bodypainting article for their Spring edition. I thought this might be a good project to document and I asked photographer Don Crossland to shoot the progress photos of me in action while I was painting Sonja. Here is the spread that made it into the magazine (click on the images to download the PDF versions) and below are the images and the text submitted to Illusion.
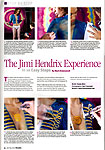 
The Jimi Hendrix Experience in 10 Easy Steps
By Mark Greenawalt
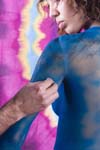
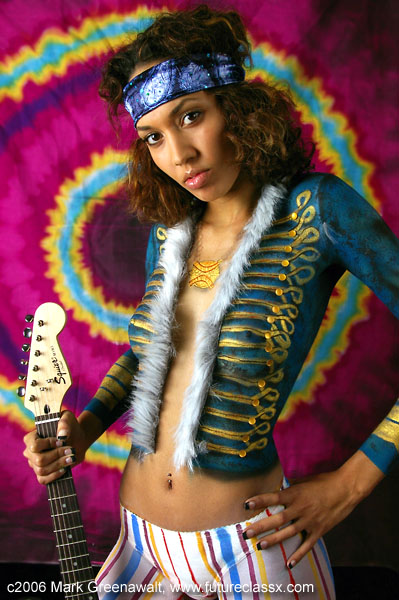
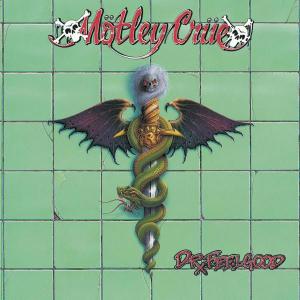
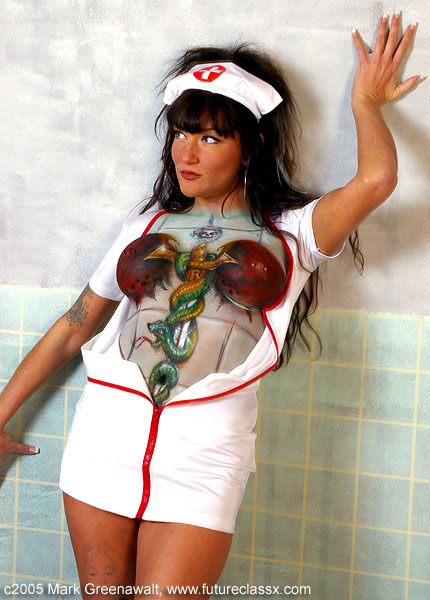
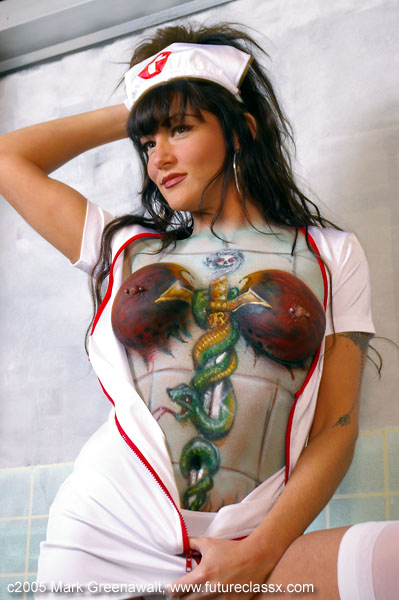
The Paper Heart Art Gallery in Phoenix, Arizona USA holds an annual exhibition entitled “Sex, Drugs, and Rock & Roll”. The exhibition includes paintings and photographs that celebrate this theme and also features live rock bands and burlesque performers. I have been invited to be a part of the festivities doing live bodypainting demonstrations for the past five years. My past paintings have included a Les Paul guitar, a portrait of Jim Morrison of the Doors, another of Gene Simmons of Kiss, and last year I painted the cover of Motley Crue’s Dr. Feelgood CD. This year my theme was Jimi Hendrix.
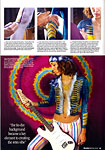
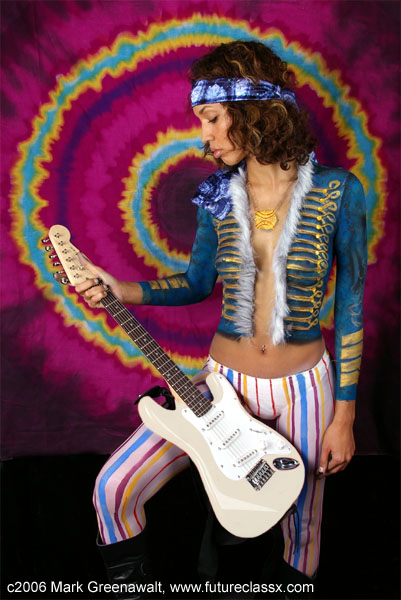
Initially I had been planning on doing a Led Zeppelin theme and I had come up with a couple of potential designs. However when model Sonja Allen was referred to me, her black heritage and features immediately brought the Jimi Hendrix theme to my mind. I googled for images of Hendrix and kept finding this flamboyant bandleader jacket that he often wore. I was looking for just the right picture to paint on Sonja’s upper torso when the inspiration hit me to paint the jacket on her instead. To complete the costume I also painted stripped pants on her.
Step 1 – Preproduction. To prepare for this bodypainting and photosession, I spent about $50US at the craft store. I was searching for beads for a 1970’s backdrop, but I happened upon some tie-dyed material. I loved it and ironically I think that the tie-dye background became a key element to creating the retro vibe. I also picked up some material for the headband, some gold buttons, and a strip of faux fur. I also bought two yards of gold rope to incorporate into the painting, but forgot about it and didn’t end up using it.
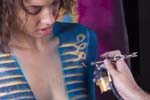
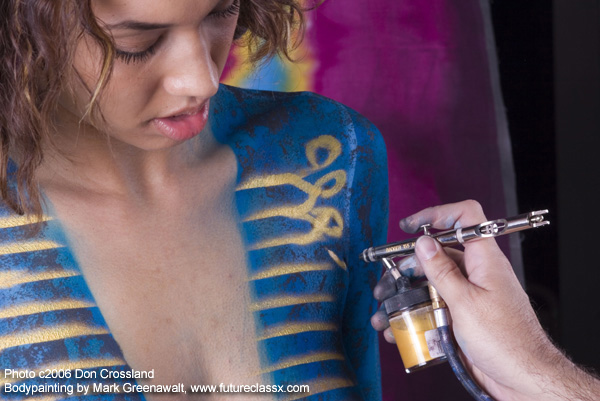
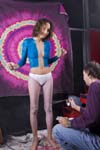 Step 2 – The bodypainting started with a base of blue for the jacket and white for the pants. I used paper towels for masking around the jacket. I often use paper towels and foam sheets for stencils since they are very flexible and have soft edges for model’s skin. I used a Badger airbrush and compressor. I chose Reel Creations paints for their longevity and also because I wanted to have a water-proof base coat. Reel Creations paints are alcohol based. Step 2 – The bodypainting started with a base of blue for the jacket and white for the pants. I used paper towels for masking around the jacket. I often use paper towels and foam sheets for stencils since they are very flexible and have soft edges for model’s skin. I used a Badger airbrush and compressor. I chose Reel Creations paints for their longevity and also because I wanted to have a water-proof base coat. Reel Creations paints are alcohol based.
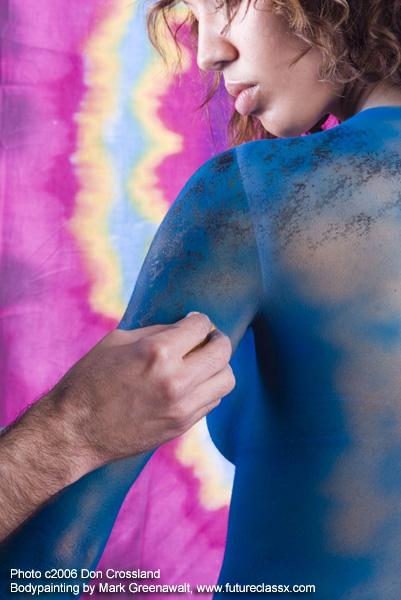
 Step 3 – I wanted the jacket to have a crushed velvet texture. To achieve this look I used a sponge to apply black Mehron liquid make-up over the blue base. Since the Mehron is water-based, it does not reactivate the Reel Creations paint. The black is watered down and sponged on similar to faux finishing for wall painting. Step 3 – I wanted the jacket to have a crushed velvet texture. To achieve this look I used a sponge to apply black Mehron liquid make-up over the blue base. Since the Mehron is water-based, it does not reactivate the Reel Creations paint. The black is watered down and sponged on similar to faux finishing for wall painting.
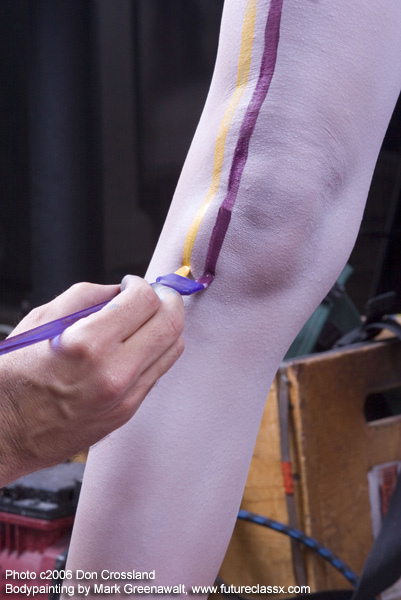
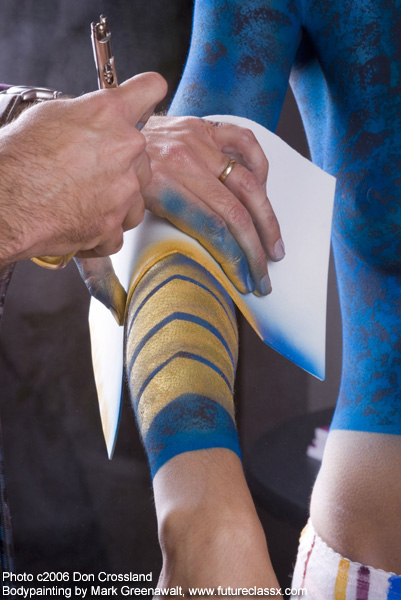
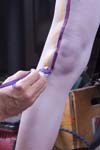 Step 4 – Next were the stripes for the pants. I found a black & white picture of Hendrix wearing striped pants and I know that they were very representative to 70’s fashion. I couldn’t tell what the colors actually were so I chose a blue to coordinate with the jacket and then randomly chose purple, yellow, and red for the other stripes. One of the time saving tips I utilized during this step was using a two-headed paintbrush and picked adjacent colors in the Paradise 8-color palette from Mehron. This kept at least two stripes evenly spaced, but it was tricky to remember to always orient the brush in the right color palette. Step 4 – Next were the stripes for the pants. I found a black & white picture of Hendrix wearing striped pants and I know that they were very representative to 70’s fashion. I couldn’t tell what the colors actually were so I chose a blue to coordinate with the jacket and then randomly chose purple, yellow, and red for the other stripes. One of the time saving tips I utilized during this step was using a two-headed paintbrush and picked adjacent colors in the Paradise 8-color palette from Mehron. This kept at least two stripes evenly spaced, but it was tricky to remember to always orient the brush in the right color palette.
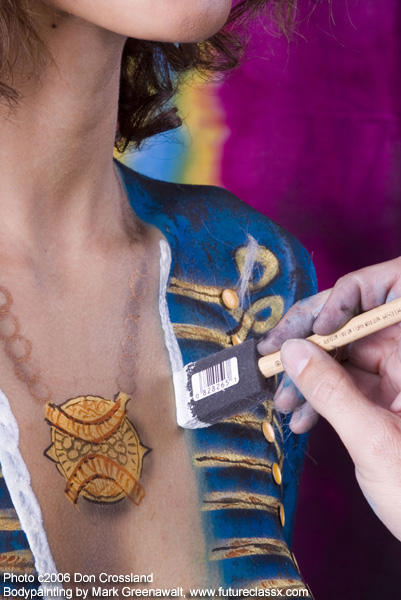
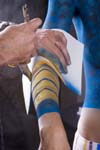 Step 5 – My next step was the four chevrons on each sleeve. I absolutely love the Monarch Gold from Reel Creations. It has an incredibly rich warmth and Fred Blau, owner of Reel Creations, told me that it is known in Hollywood as 14 Karat Gold. I was able to airbrush the gold over the blue and it is completely opaque. I cut out a simple stencil from a foam sheet and airbrushed the bottom of each chevron first and then used the inverted side of the stencil for the top of each chevron. Lastly I used a strait piece of foam to complete the edge of each chevron. There is also a complex gold design above the chevrons that I roughly freehanded for effect. Step 5 – My next step was the four chevrons on each sleeve. I absolutely love the Monarch Gold from Reel Creations. It has an incredibly rich warmth and Fred Blau, owner of Reel Creations, told me that it is known in Hollywood as 14 Karat Gold. I was able to airbrush the gold over the blue and it is completely opaque. I cut out a simple stencil from a foam sheet and airbrushed the bottom of each chevron first and then used the inverted side of the stencil for the top of each chevron. Lastly I used a strait piece of foam to complete the edge of each chevron. There is also a complex gold design above the chevrons that I roughly freehanded for effect.
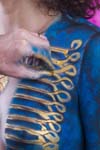
 Step 6 – Learning the ropes. This was probably the most important step since it is such a focal point of the bodypainting. The jacket is decorated with a sewn-on golden rope in a very symmetric pattern. The lines would have been sharper if I had hand brushed this part, but to save time I airbrushed the basic pattern using a foam sheet strait edge. I free handed the loops once all of the strait lines were in place. Later, I came back to add additional dimension to the ropes by adding brown diagonal stripes using a fan brush and a few harsh shadows with Wolfe Brother’s black paint. I also gave a light dusting of black airbrush paint below each rope to add a softer shadow. Step 6 – Learning the ropes. This was probably the most important step since it is such a focal point of the bodypainting. The jacket is decorated with a sewn-on golden rope in a very symmetric pattern. The lines would have been sharper if I had hand brushed this part, but to save time I airbrushed the basic pattern using a foam sheet strait edge. I free handed the loops once all of the strait lines were in place. Later, I came back to add additional dimension to the ropes by adding brown diagonal stripes using a fan brush and a few harsh shadows with Wolfe Brother’s black paint. I also gave a light dusting of black airbrush paint below each rope to add a softer shadow.
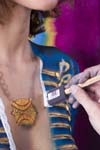
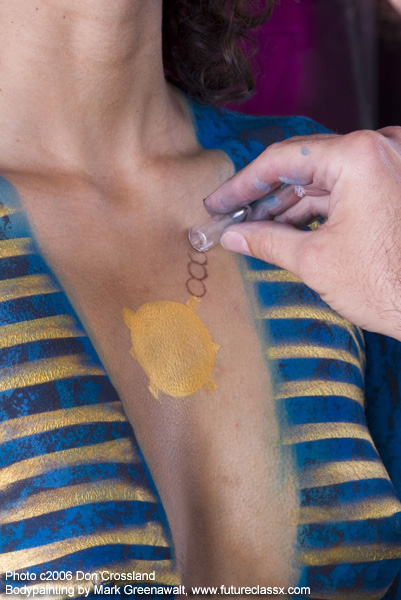
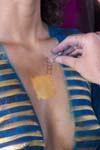 Step 7 – I had considered finding some costume jewelry for the necklace, but ended up painting it on instead. I had found some pictures of Hendrix wearing some large medallion necklaces, but I didn’t find a shot of any that were clear enough to try to match the design. I therefore just created my own design. I first used a circular cut out to airbrush a base of the gold paint. To create the chain, I took the cap off of my exacto-knife and dipped it in the gold paint of a Kryolan Aquacolor Metallic Pallette. Then I used it like a round paintbrush to “stamp” each of the chain links in place. I also added a little airbrushed drop shadow to the chain and medallion to give it a little more of a three-dimensional look. Step 7 – I had considered finding some costume jewelry for the necklace, but ended up painting it on instead. I had found some pictures of Hendrix wearing some large medallion necklaces, but I didn’t find a shot of any that were clear enough to try to match the design. I therefore just created my own design. I first used a circular cut out to airbrush a base of the gold paint. To create the chain, I took the cap off of my exacto-knife and dipped it in the gold paint of a Kryolan Aquacolor Metallic Pallette. Then I used it like a round paintbrush to “stamp” each of the chain links in place. I also added a little airbrushed drop shadow to the chain and medallion to give it a little more of a three-dimensional look.
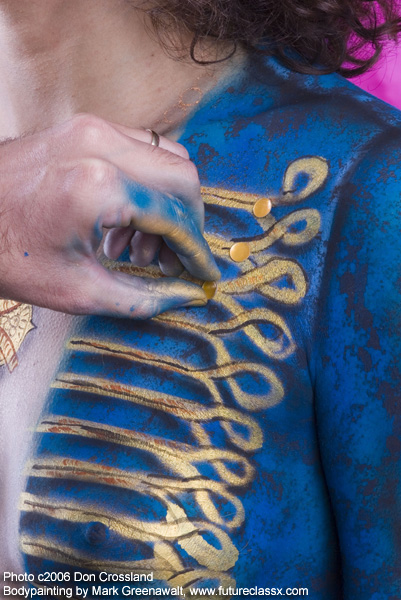
 Step 8 – Accessorize! The jacket has quite a few buttons on it and I found some gold iron-on buttons at the craft store that matched quite nicely. Each button was glued on using Ben-Nye spirit gum. At this step Sonja donned the boots and a Jimi Hendrix trademark headband. Step 8 – Accessorize! The jacket has quite a few buttons on it and I found some gold iron-on buttons at the craft store that matched quite nicely. Each button was glued on using Ben-Nye spirit gum. At this step Sonja donned the boots and a Jimi Hendrix trademark headband.
 Step 9 – The last step was to add the faux fur. To make it stick I used a sponge brush to apply Deviant brand liquid latex and then gently pressed the backing of the fur against it before it was dry. Step 9 – The last step was to add the faux fur. To make it stick I used a sponge brush to apply Deviant brand liquid latex and then gently pressed the backing of the fur against it before it was dry.
Step 10 – The photoshoot. I borrowed my son’s electric guitar to use as a prop. It didn’t quite match the guitar that Hendrix played since it was a 3/4-scale guitar and the wrong color, but it worked as a makeshift prop. Although it seemed intuitive to hold the guitar right-handed, I had Sonja hold it left-handed, another Hendrix trademark.
All in all, the painting took about 2 hours to complete and the photoshoot lasted about 30 minutes. That was the Jimi Hendrix experience. Maybe next year I’ll revisit the Led Zeppelin ideas.
|  SEX, DRUGS, AND ROCK N' ROLL
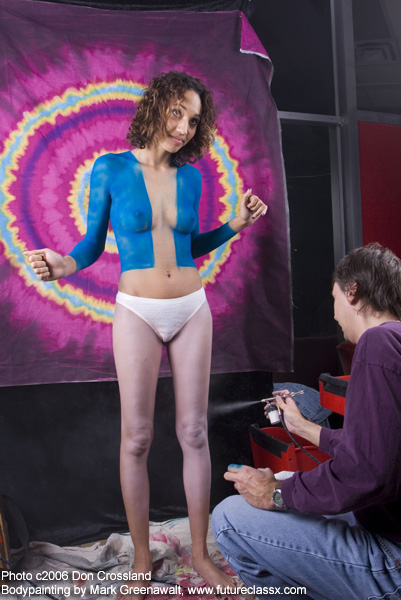

